One of our favorite times of year is BULK PICKUP! For those of you that aren’t familiar with the term, bulk pickup is when everyone puts their junk out to the curb and the town schedules a neighborhood wide pickup to haul it off to the dump. As for junkers, metal collectors, and us upcyclers, all we see are dollar signs! There is something about riding around wide eyed, gloves in hand ready to hop out of the truck and grab your new found treasure.
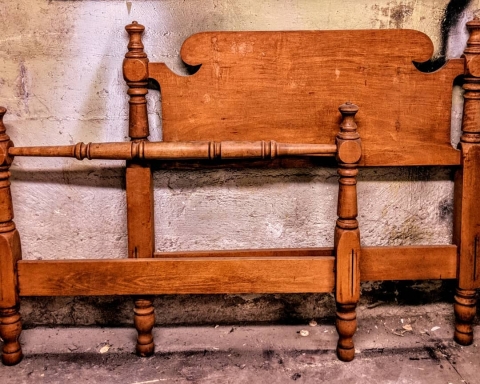
Just this last year, on our annual Sunday night hunt we came across a headboard and footboard. They had been buried under a pile of scrap wood, full of nails and covered in mold. As soon as we saw it peaking out, we knew it would be worth the tetanus shot! So with my superb supervision and Steve’s muscles, the bed was in the truck along with other miscellaneous items. We unloaded the truck and there the bed sat, in the basement for a few months. After moving it out of our way multiple times, inspiration struck! A PORCH SWING!!!
Out came the reciprocating saw and the leg amputation began! Once all 4 legs had been trimmed off to the size that seemed proportionate. We then cut the footboard in half, these pieces would become the arms.
We kept the headboard whole aside from removing the cross brace on the bottom that would be used for the front of the swing. Since I wanted to keep it natural wood it was important that we used as much original that we could to ensure it all matched. I would have had a hell of a time matching the aged patina of the wood...
We then assembled the swing frame with pocket holes drilled from the back and through the ends of the arms to hide all the screws. The front piece was attached using a Kreg jig and screwed from behind. To make sure that it would be sturdy and hold the weight of 2 adults that enjoyed tacos we reinforced the joints with wood glue. To brace it we used well hidden 1 x 2’s with a cross support.
Once the structural part was complete, it was all about cosmetics! The wood had potential but was filthy and had a hideous orange hue. I was dreading sanding it by hand since there were so many rounded surfaces. I began wiping it down thoroughly; as I grabbed for the degreaser I came across the Formby's Furniture Refinisher that I had purchased and hadn’t found a use for yet… Holy life changer!!! The best way I can describe this product is it’s like nail polish remover for furniture (did a great job of removing my nail polish as well, so make sure you follow the directions and use gloves!). A few hours, a sore elbow and almost an entire container of Formby’s Furniture Refinisher later…The old finish was stripped and I finally achieved the natural, sun bleached look that I had been going for! Since this would most likely be for outdoor use, I sealed the piece with a Minwax water based polycrylic to make sure that it would not undo all my hard work and eventually turn amber as an oil based sealer would. I sanded with a 320 grit sandpaper and finished with wax for the soft feel I was looking for.
Next, I was on the hunt for the perfect seat. After tossing around the idea of using pallet wood or strips of 1 x 2. I had decided to go with a tried and true favorite of mine… canvas dropcloth! I had used this material on a chair that I had refinished some time ago and loved the way the organic, clean (and inexpensive) linen color played against the wood. Why reinvent the wheel? I picked up a 2 inch foam cushion that I had cut to size.
To upholster the cushion I had cut a piece of plywood to inset into the swing and rest on the interior support. I used spray adhesive to secure the foam to the wood and let set. After the glue had dried I sprayed another coat of spray adhesive on the top of the foam cushion and carefully laid the fabric over, making sure there were no wrinkles or creases. I went ahead and turned it over and folded the fabric about an inch over the bottom and stapled with a pneumatic staple gun.
To hang the swing we used eye hooks on the 4 corner posts about an inch from the bottom. I wanted to make sure they were secure and wouldn't crack the wood. Once the holes were pre drilled they screwed in easily.
And Lastly, the rope! We decided on a natural fiber rope that held up to 300 lbs. In order to make sure that it was long enough, we accounted for 9 foot ceilings and purchased 40 feet of the rope. The working load would be 300 lbs x 4 to total 1,200 lbs (so much wiggle room for tacos!)… After researching knots we decided on the Ashley Stopper knot. After threading the rope through the eye hooks, and a few tries at perfecting the knot, we got all 4 uniform and left about 6 inches hanging down. Then I frayed the loose ends below the knot to give it that final touch.


